I recently tweeted about some of the work I’m doing around GPU debugging tools (more specifically GPU-driven line rendering) in my home real-time rendering project. Since the tweet gained a good amount of traction and generated a bunch of questions, I thought I’d do a bit of a write-up about how the system works and and about how GPU-driven rendering works in general.
A line rendering system is a perfect introduction to the fundamentals of GPU-driven rendering, as it is generally self-contained, requires fairly minimal changes to existing code and runs you through most of the core concepts required for more advanced and general use cases of the technique.
The goal
Debugging or visualizing intermediate results of your shader code can be difficult. When writing CPU-side code you can often add in debug switches to print debug data out to the screen or a log, or to render a nice visualization of what your code is doing in real-time.
On the GPU your options tend to be more limited. If you’re writing a pixel shader you could choose to write some intermediate values to the screen instead of your final color. For any other type of shader you could write data to some read/write buffer or texture which you can then read back, parse and visualize at a later time. A more advanced immediate visualization such as rendering lines or shapes becomes a more difficult problem.
To address this, we want a simple API which can be used in any shader to draw individual lines or wireframe primitive shapes within the same frame the shader code was executed. This means that we don’t want to read any data back for CPU-side code to issue debug draw calls, and we don’t want any latency between the invocation of the relevant shader and its corresponding line visualization.
An ideal API in HLSL would look something like this:
void DrawLine(float3 position0, float3 position1, float4 color0, float4 color1);
void DrawAxisAlignedBox(float3 center, float3 extent, float4 color);
void DrawSphere(float3 center, float radius, float4 color);
...
And as an example, the expected result of calling DrawAxisAlignedBox should be something like this image which I shared in my tweet:
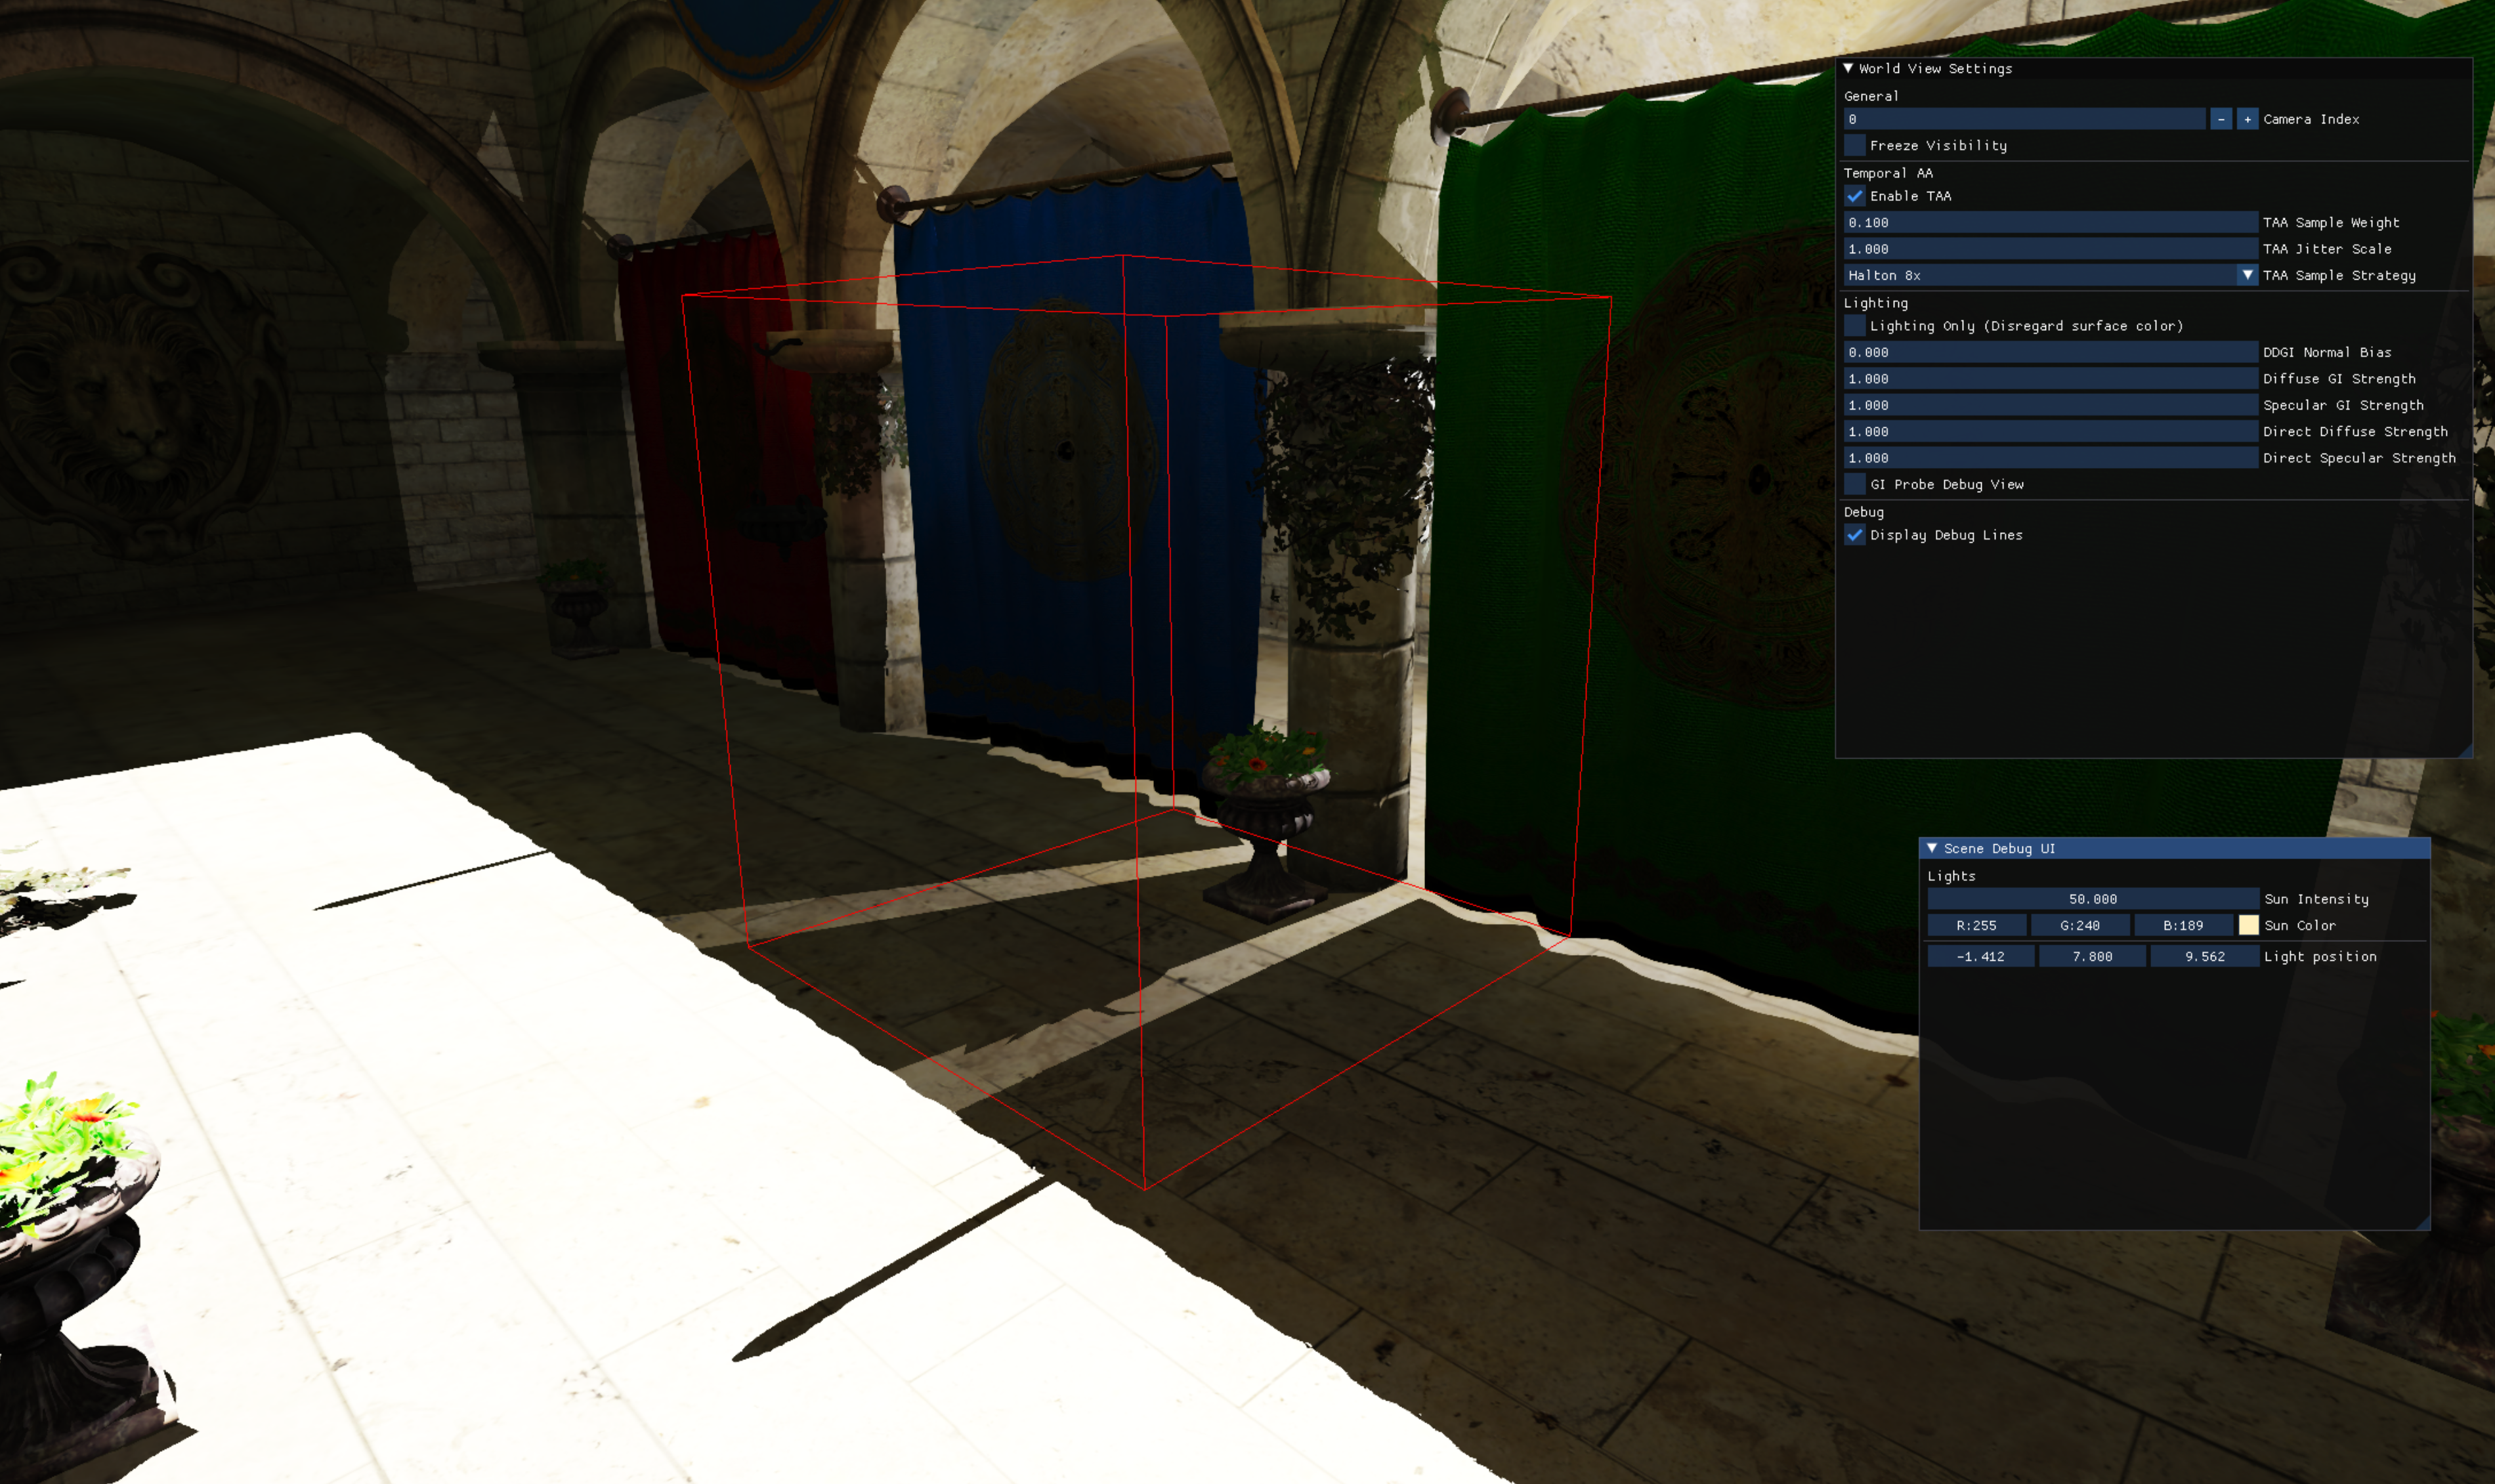
Let’s walk through the steps on how to get there, and let’s introduce some concepts you might need to achieve this.
What is GPU-driven rendering?
If you’re already familiar with the concepts of GPU-driven rendering, feel free to skip this section. If you aren’t, let’s dig into what we mean exactly when we use the term GPU-driven rendering.
GPU-driven rendering describes a collection of techniques to move traditional CPU-side graphics tasks, such as what, where and when to draw things, to the GPU. In an ideal world we want the GPU to be in control of operations such as issuing draw calls, binding resources, changing state, and more.
There are a few reasons why we would want to offload rendering work traditionally done on the CPU onto the GPU. The first and most obvious reason is to purely free up the CPU for other operations. If your application is CPU-bound, this can free up some precious resources for critical CPU-side tasks.
The second reason is to eliminate the latency introduced by techniques which traditionally rely on CPU-GPU roundtrips. A great example of this type of technique is GPU-side occlusion culling to determine a visible set of items to draw. Where traditionally we might have let the GPU calculate visibility on one frame, only to read it back CPU-side a few frames later (which can introduce ‘popping’ of objects due to the latency), we can now use those visibility results immediately in the same frame by giving the GPU the authority over issuing draw calls.
A lot of these things are possible to a large degree today, depending on the platform you’re targeting, either through built-in functionality in APIs such as DirectX, OpenGL, Vulkan or Metal with vendor-specific extensions to those APIs unlocking even more functionality. In fact, games have shipped before with fully GPU-driven rendering pipelines for all of their world rendering.
Indirect rendering
At the heart of all current-gen GPU-driven rendering techniques lies the concept of the indirect draw or indirect dispatch. To explain the difference between a “normal” draw call and an indirect draw call, let’s take a look at what an indexed draw call might look like in a contemporary graphics API:
void DrawIndexedInstanced(
  UINT IndexCountPerInstance,
  UINT InstanceCount,
  UINT StartIndexLocation,
  INT  BaseVertexLocation,
  UINT StartInstanceLocation
);
Based on the vertex buffer(s), index buffer and potential instancing data you’ve bound to the graphics pipeline you’ll specify values for the various arguments taken by DrawIndexedInstanced so that your geometry and its instances show up correctly on screen.
An indirect draw call might look more like this:
void DrawIndexedInstancedIndirect(
  const GPUBuffer* ArgumentBuffer,
  UINT OffsetInArgumentBuffer
);
Instead of specifying arguments for your draw call at the time where you issue the draw on the CPU, you specify a location in GPU-accessible memory where those arguments can be found at the time the GPU executes the draw. This means that this data can now be provided by a shader!
// Trivial HLSL compute shader populating a buffer with indexed instanced draw arguments

struct IndexedInstancedDrawArgs
{
  uint IndexCountPerInstance;
  uint InstanceCount;
  uint StartIndexLocation;
  int  BaseVertexLocation;
  uint StartInstanceLocation;
};

RWStructuredBuffer<IndexedInstancedDrawArgs> OutDrawArgs;

[numthreads(1, 1, 1)]
void main()
{
  IndexedInstancedDrawArgs args;
  args.IndexCountPerInstance = 36;
  args.InstanceCount = 1;
  args.StartIndexLocation = 0;
  args.BaseVertexLocation = 0;
  args.StartInstanceLocation = 0;

  OutDrawArgs[0] = args;
}
This concept of an indirect draw can be extended even further. Multi-indirect draws allow you to specify a sequence of these arguments, sometimes together with a GPU-accessible memory region which contains a counter value specifying how many draws you want to issue. Aside from issuing draw calls, corresponding methods exist for doing indirect compute shader dispatches, indirect ray dispatches (for ray tracing) and even indirect meshlet dispatches (for use with mesh shaders).
The DirectX 12 API takes this even further by introducing a generic ExecuteIndirect API* which allows you to provide commands for changing vertex buffers, root constants and root parameter resources before issuing a draw (with even more options being available on console). This opens up a wide variety of possibilities when it comes to taking the CPU out of the equation for state changes.
DirectX 11 (ID3D11DeviceContext) | DirectX 12 (ID3D12GraphicsCommandList) | Vulkan |
DispatchIndirect(...) | ExecuteIndirect(...) | vkCmdDispatchIndirect(…) |
DrawIndexedInstancedIndirect(...) | vkCmdDrawIndexedIndirect(…) | |
DrawInstancedIndirect(...) | vkCmdDrawIndirect(...) | |
vkCmdTraceRaysIndirectKHR(...) | ||
vkCmdDrawMeshTasksIndirectNV(...) |
*A note on ExecuteIndirect: While incredibly flexible, some GPU architectures might not handle any of the usages of ExecuteIndirect outside of issuing plain draw calls or dispatches well. At the time of writing, AMD recommends avoiding any complex usage of ExecuteIndirect on their hardware, citing performance as a concern. I’m assuming this is due to hitting a sub-optimal slow path to allow for injection of state changes in between draws or dispatches. If anyone has any insight on what exactly happens under the hood, I’d love to learn more about it. For complex GPU-driven rendering pipelines alternative methods exist, but those are for a future blog post!
Building the line renderer
Now that we’re familiar with the concepts and building blocks we’ll be using, let’s move on to the actual line rendering. We want to draw arbitrary lines in world space with per-vertex colors. Let’s break down the steps required to do this the simplest way possible:
- Populate a vertex buffer with points describing your lines in world space. Every subsequent pair of points represent a line. A point can be represented by a float3 indicating position, and an unsigned integer to store an 8 bits per channel RGBA color, making for 16 bytes per point.
- Bind this vertex buffer to the graphics pipeline
- Change your primitive topology to draw line lists
- Bind your line rendering pipeline state object (or shaders + other relevant state if your API doesn’t have PSOs) to the graphics pipeline
- Issue a non-indexed draw call with vertex count equal to the amount of points in your vertex buffer
To make this approach GPU-driven, not a whole lot needs to change. First of all we need to build a mechanism to allow arbitrary shaders to populate our line vertex buffer from step 1. This is were our shader line drawing API described above comes into play. Second of all, we need to replace our “normal” draw call in step 5 with an indirect draw call specifying a vertex count equal to the amount of vertices written into our vertex buffer by the line drawing API.
Populating the line vertex buffer and indirect draw arguments
To allow our vertex buffer and indirect arguments buffer to be written to by any shader, we’ll have to make sure these buffers are always bound as read/write resources (or UAVs in DirectX terminology) to some exclusive shader registers which won’t be used by other resources. Choosing some high register number can do the trick.
Note: For the purposes of this blog post I’m not going to assume that you’re using more advanced methods of interacting with resources within shader code (e.g., bindless resources). While I do use bindless resources in the project in which I implemented this technique, they are not a requirement for this line rendering system to work.
Adding new lines to the vertex buffer can now be done using the following steps:
- Increment the
VertexCountPerInstanceparameter (which is defined by the first 4 bytes of our indirect draw args buffer) atomically by 2 usingInterlockedAdd, as we are adding two vertices to the vertex buffer. Make sure the buffer starts off in a state whereVertexCountPerInstanceis 0 andInstanceCountis 1. See this page for more detail on draw argument layouts in DirectX. - Determine the offset to write to in our vertex buffer using the original value returned by the
InterlockedAddcall. - Write the interleaved position and color values for your line to the calculated offset
In HLSL this could look something like this:
// DebugLineRendering.hlsli

struct DebugLinePoint
{
  float3 position;
  uint color;
};

RWStructuredBuffer<DebugLinePoint> LineVertexBuffer : register(u126);
RWByteAddressBuffer LineArgsBuffer : register(u127);

uint ToUnormRGBA(float4 c); // Left to the reader

void DrawLine(float3 position0, float3 position1, float4 color0, float4 color1)
{
  // Increment our vertex count atomically to indicate we're adding a line
  // The VertexCountPerInstance member is the first 4 bytes in the argument buffer
  uint offsetInVertexBuffer;
  LineArgsBuffer.InterlockedAdd(0, 2, offsetInVertexBuffer);

  // Use the offset we got back from InterlockedAdd to determine where to write our points
  // Checking to make sure we don't exceed our vertex buffer capacity is left to the reader
  uint firstPointIndex = offsetInVertexBuffer / sizeof(DebugLinePoint);
  DebugLinePoint p;
  p.position = position0;
  p.color = ToUnormRGBA(color0);
  LineVertexBuffer[firstPointIndex + 0] = p;

  p.position = position1;
  p.color = ToUnormRGBA(color1);
  LineVertexBuffer[firstPointIndex + 1] = p;
}
Now any shader which includes our DebugLineRendering.hlsli file can use DrawLine to add new lines to the vertex buffer and increment the vertex count property of the draw arguments, as long as those buffers have been bound to the pipeline correctly. Care needs to be taken to not accidentally call DrawLine from every single thread running your shader, unless you want to fill up your vertex buffer very quickly. In common use cases you’ll want to select one or more threads of interest which will be responsible for drawing lines.
Other primitive types such as boxes, spheres, cones, etc. can now be implemented using sequential invocations of the DrawLine function.
Note: Issuing calls to DrawLine from within shaders of course isn’t free in terms of performance. Use this approach primarily as a debugging tool, and provide the possibility to compile any debug line rendering out of your shaders when you care about performance.
Drawing the lines
Now that we have our vertex buffer and draw arguments, we can set up our line rendering draw call after main scene rendering has finished. We follow the line rendering steps listed above, but instead of issuing a normal draw call, we use an indirect draw call using our argument buffer as an input.
Final thoughts
This technique is a fun introduction to indirect rendering and some basic GPU-driven rendering concepts, and provides an incredibly useful tool in your everyday shader development toolbox. Other debugging techniques such as GPU-driven debug text rendering are possible as well with the same fundamental building blocks as this technique.
If you’re interested in seeing a live implementation of a system like this in a large scale codebase, Unreal Engine implements a debug renderer like this one as part of their ShaderDrawDebug system.
Additional niceties such as anti-aliased lines are completely possible, but you’d like have to come up with a more complex line representation compared to the built-in line list topology provided by current graphics APIs.
In my next blog post I’m hoping to dive a bit more into GPU-driven rendering for whole scene rendering and how modern renderers are structured to make this possible on current generation hardware.
For any questions, feel free to comment below, or reach out to me on twitter @BelgianRenderer. Big thanks to @DrGr4f1x and @sakibsaikia for reviewing this post before it went live!
Thanks for reading!
How would you approach the scenario of having depth-tested debug lines? Could you toggle between strictly post-process and depth-aware modes? (Dave from work asking here)
I had a lot of success with depth-aware line rendering by hooking up the main scene depth buffer with depth writes disabled. Should handle the vast majority of occlusion cases! I’m sure there are some edges cases where you’d want to do something custom, but those haven’t popped up yet for me.
Hey, thanks for this interesting post. I am trying to implement it for my Vulkan renderer as it is a very useful debug tool but I am a bit confused as I am not very familiar with indirect rendering :
– My understanding is that if I wanted to draw a debug sphere from an arbitrary fragment shader (say visualizing a point light) , I would have to call DrawSphere(…) and this would offset into and write the sphere vertices to the debug vertex buffer. But what if I wanted to draw the same sphere with a position that changes overtime ? My concern is that it would quickly fill up the vertex buffer, perhaps I am missing something?
– You also say “Care needs to be taken to not accidentally call DrawLine from every single thread running your shader”, from my example of using it inside a fragment shader, do you have an example of how would this be done ?
Thanks again!